
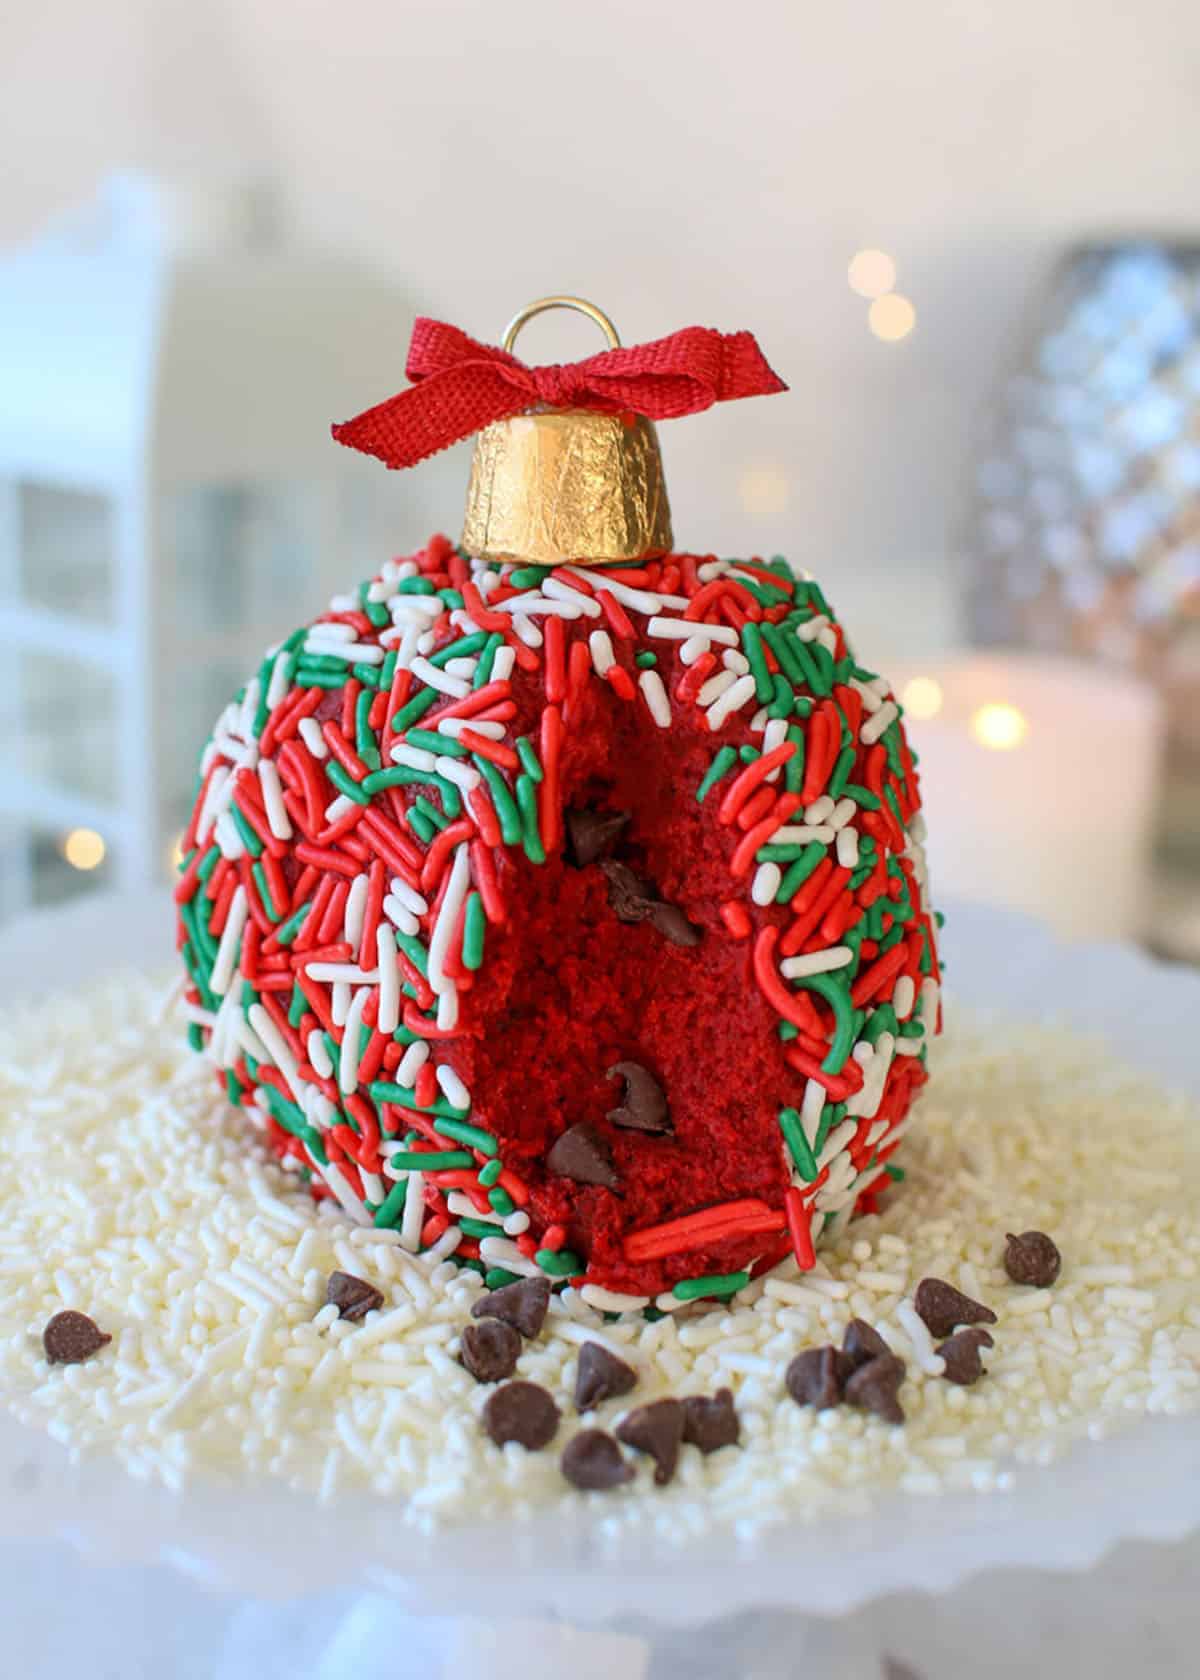
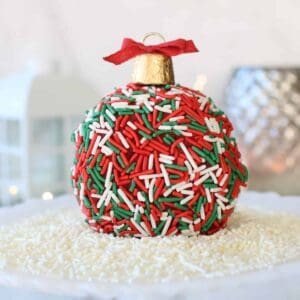
These Christmas Ornament Red Velvet Cheese Balls are a fun, festive addition to your holiday party menu! These super easy treats are sure to get everyone in the holiday spirit!

It’s the most wonderful time of the year! Instead of a savory cheese ball, why not make it sweet with a dessert cheese ball shaped as ornaments instead? Cream cheese is usually found in cheese balls. So, what dessert goes best with cream cheese? Red velvet! Say hello to these seriously adorable Christmas Ornament Red Velvet Cheese Balls. It's topped with the cutest rolo ornament topper!
The best way I thought to get red velvet flavor and color while keeping the texture of the cheese ball is to use cake mix. It's rolled in festive sprinkles and there's chocolate chips mixed in for a delicious surprise.
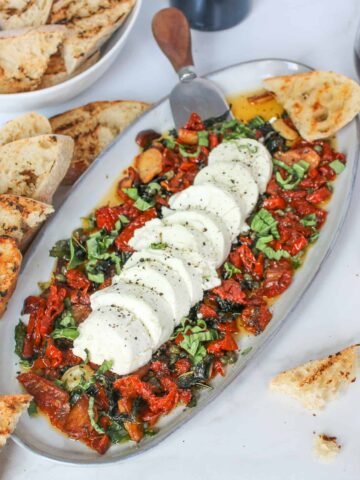
Looking for a savory cheese ball? You have to check out my Ornament Pesto Sun-dried Tomato Cheese Balls! Only 5 ingredients and are equally as adorable and festive.

Why You'll Love this Recipe
- Perfect for holiday entertaining!
- Seriously adorable! It will get everyone into the holiday spirit.
- Super easy to make
- Only 7 ingredients and can be versatile to your taste.
Ingredients
See the full list of ingredients and quantities in the recipe card at the bottom of the post.
Ingredient Notes
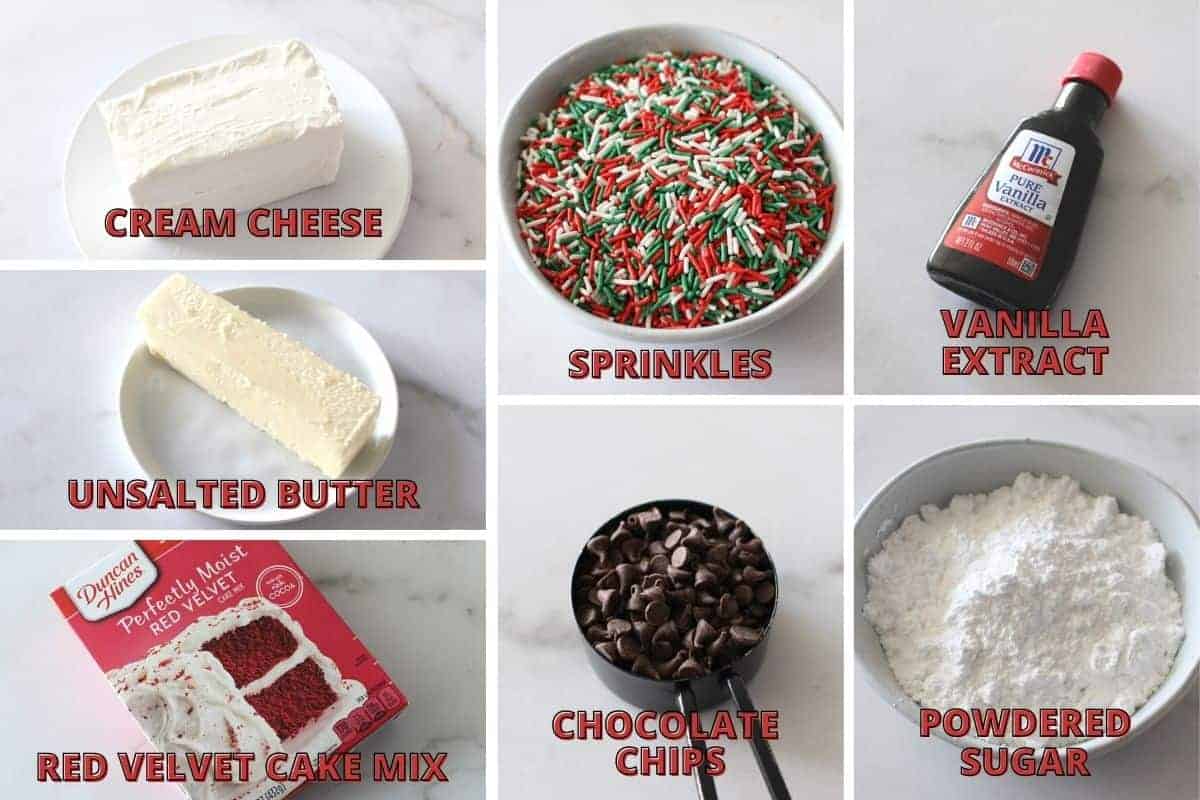
- Red Velvet Cake Mix: Gives the red velvet flavor and color! You can use any brand of cake mix as long as it's about 15.25 ounces.
- Unsalted Butter: Make sure it is at room temperature to easily combine with cream cheese to create our cheese base.
- Cream Cheese: Creamy & tangy! Make sure it is at room temperature to easily combine with butter to create our cheese base.
- Vanilla Extract: flavor addition!
- Chocolate Chips: red velvet isn't red velvet without a bit of chocolate. I like using mini chocolate chips to fold throughout the batter for a delicious surprise.
- Sprinkles: makes these edible ornaments extra cute and festive and gives extra texture. If you don't like sprinkles, you can use chocolate chips instead.
Step-by-Step Instructions
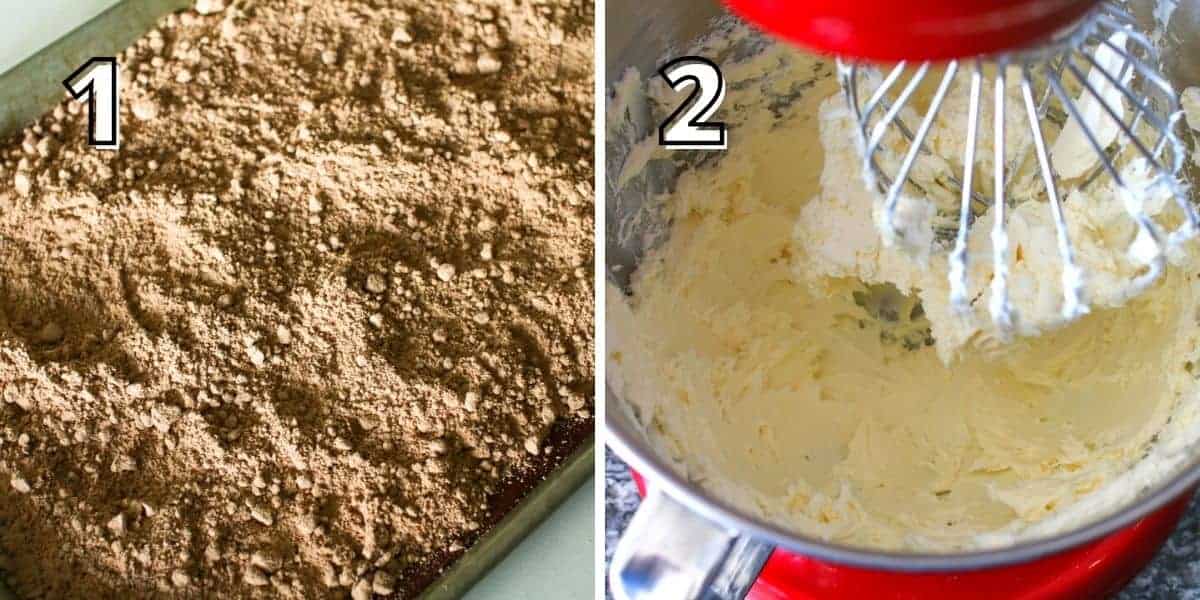
- Pre-heat an oven to 350°F. Spread cake mix onto a baking sheet lined with parchment paper or silicone mat. Bake for 5-10 minutes at 350° F until the cake mix reaches a temperature of 160°F. Then, cool for 30 minutes or until room temperature.
- In a stand mixer bowl or large mixing bowl, whip cream cheese and butter using a stand mixer with a whisk attachment or hand mixer until smooth.
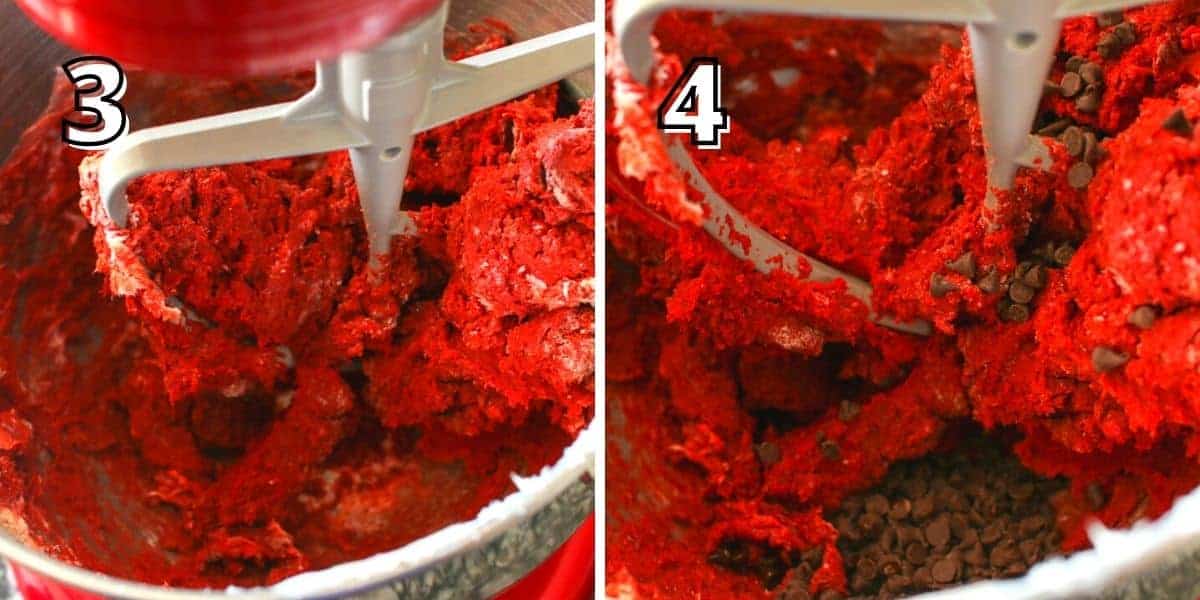
- Next, sift in cooled red velvet cake mix and powdered sugar to the butter and cream cheese mixture. Beat until smooth using a stand mixer with beater attachment or by hand.
- Next, add in chocolate chips and vanilla extract and beat until incorporated.

- Scoop 1 cup of the mixture out and shape into a ball with your hands. Gloves are recommended!
- Place the shapen ball into 1-2 sheets of plastic wrap and wrap it. Repeat 3 more times and place the cheese balls in the refrigerator for 2 hours to firm up. While they firm up, make the rolo ornament topper. Steps and photos are listed at the end of this post.
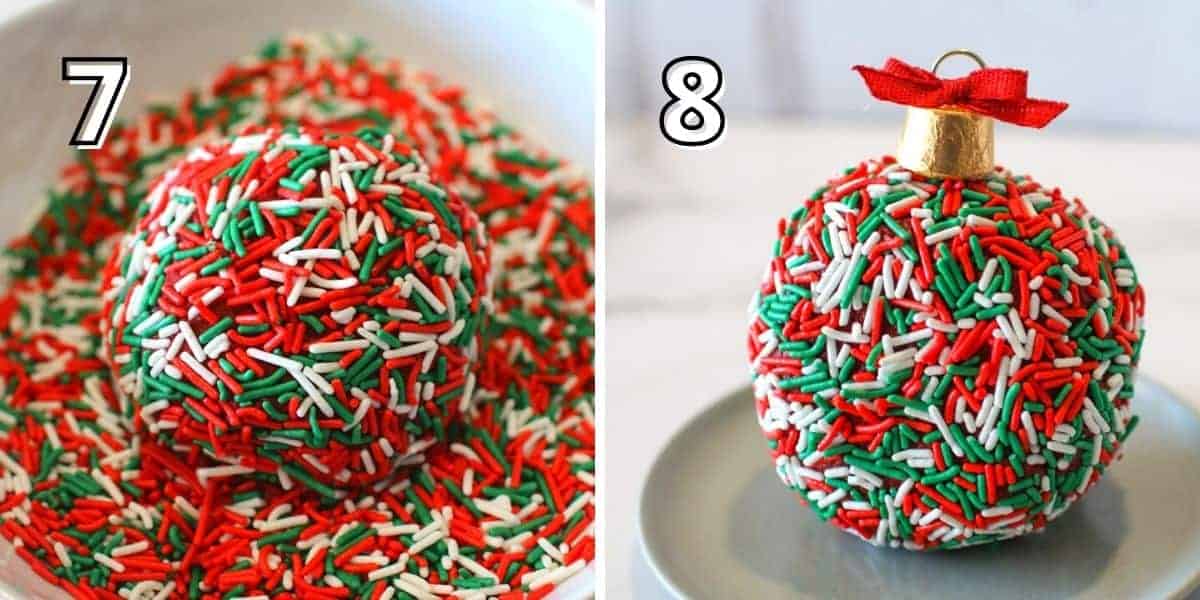
- Before serving, roll the ball in a bowl with high sides with sprinkles.
- Top with the rolo ornament topper and serve with cookies of your choice or pretzels!
Expert Tips
- Baking cake mix is a must!: Raw flour may contain harmful bacteria when eaten uncooked. Toast the cake mix in a 350F oven for 5 -10 minutes to cook it.
- Room temperature is key.: Take your goat cheese and cream cheese about an hour before you start this recipe. Having your cheese room temperature will make it easier to combine together.
- Keep it clean!: Food-safe gloves are key to spreading and forming our cheeseballs! While you can definitely do this without gloves, food-safe gloves saves you time from having to continually cleaning your hands.
Recipe FAQs
- Chocolate Cheese Ball: devil's food cake mix covered in chocolate chips or chocolate sprinkles
- Birthday Cake Batter Cheese Ball: funfetti cake mix covered in rainbow sprinkles
- Strawberry Cheesecake Ball: strawberry cake mix covered in crushed graham crackers
Dippers can include shortbread cookies, Oreos, graham crackers or pretzels just to name a few ideas!
Yes! These can be made ahead of a day or two. Keep wrapped and refrigerated until ready to serve.
1. Cut a ribbon between around 6 inches.
2. Create one loop and pinch with your thumb and index finger.
3. Wrap the longer end of the ribbon around.
4. Push the end into the opening you created and pull through.
5. Adjust the size of your bow by tugging, pushing, and pulling!
6. Until you’ve created a small bow.
7. Cut ends at an angle. Optionally, you can carefully use a lighter and fray the ends for a cleaner look depending on the ribbon used.
8. Carefully, hot glue a jump ring to the top of a Rolo candy
9. Carefully, hot glue the bow between the jump ring and Rolo. This will hide the glue. Set aside. Repeat until you have 3 toppers in total.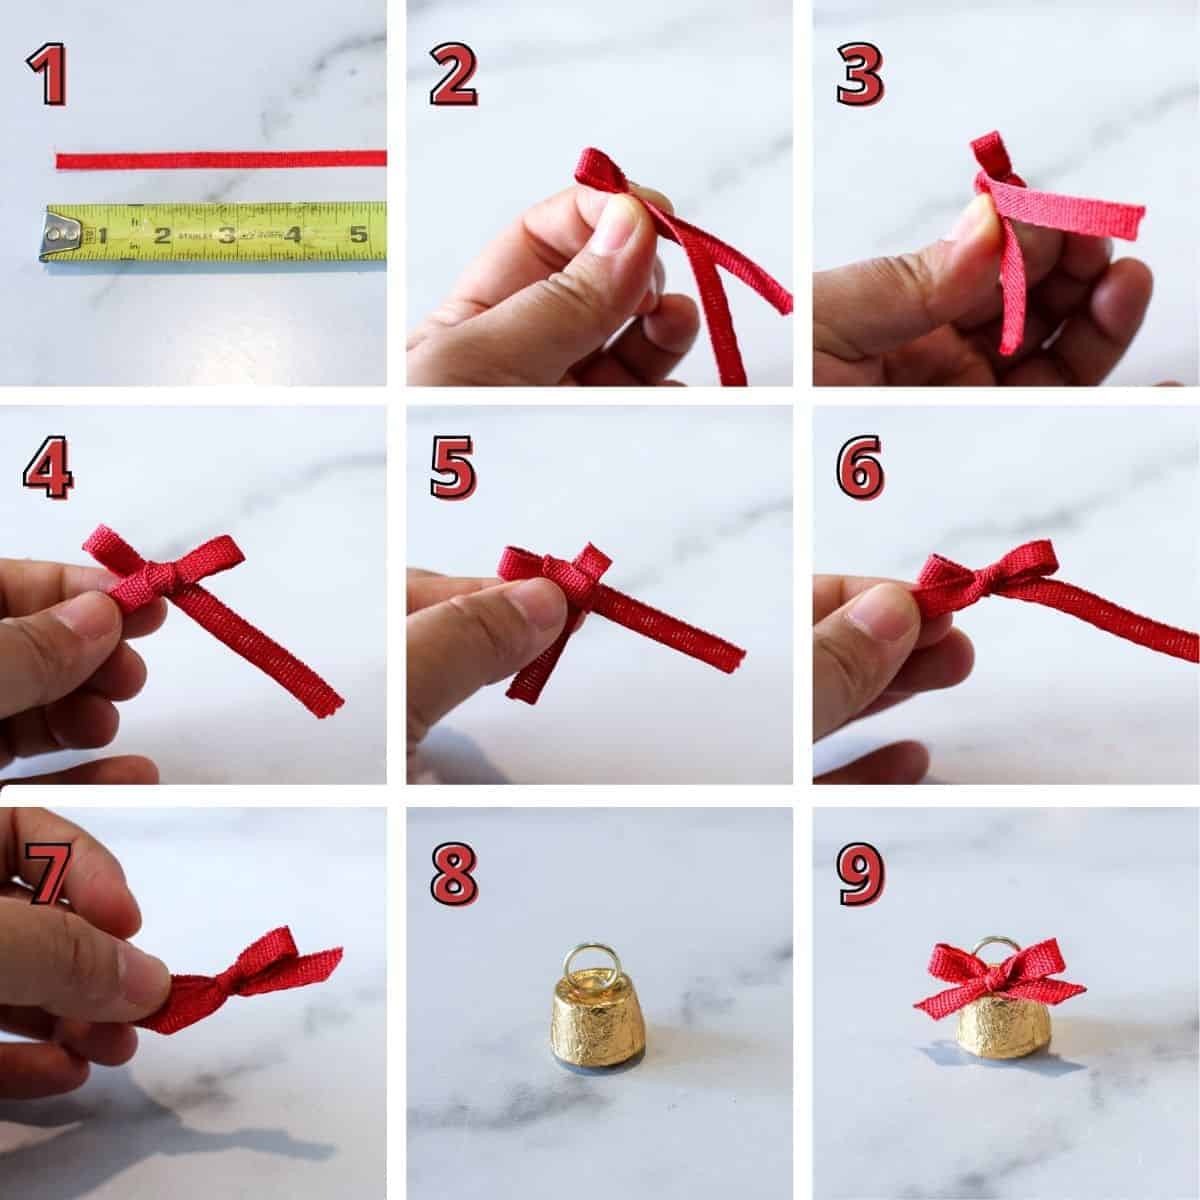
You Might Also Like

PS If you try this recipe, why not leave a star rating in the recipe card right below and/or a review in the comments section further down the page? I always appreciate feedback. You can also follow me on Pinterest, Facebook or Instagram.
Christmas Ornament Red Velvet Cheese Balls
Equipment
- Instant Food Thermometer
- Plastic Wrap
Ingredients
- 16 oz cream cheese softened to room temperature
- ½ cup unsalted butter softened to room temperature
- 1 box red velvet cake mix (15.25 oz)
- 1 & ¼ cups powdered sugar
- ¼ cup chocolate chips mini
- 1 cup sprinkles red, white and green
- 1 teaspoon vanilla extract
- vanilla wafers for serving
Instructions
- Pre-heat an oven to 350°F. Spread cake mix onto a baking sheet lined with parchment paper or Silpat. Bake for 5-10 minutes at 350° F until the cake mix reaches a temperature of 160°F. Then, cool for 30 minutes or until room temperature.
- In a stand mixer bowl or large mixing bowl, whip cream cheese and butter with a whisk attachment or hand mixer until smooth.
- Next, sift in cooled red velvet cake mix and powdered sugar to the butter and cream cheese mixture. Beat until smooth using a beater attachment or by hand using silicone spatula.
- Next, add in chocolate chips and vanilla extract and beat until incorporated.
- Scoop 1 cup of the mixture out and shape into a ball with your hands. Gloves are recommended!
- Place the shapen ball into 1-2 sheets of plastic wrap and wrap it. Repeat 3 more times and place the cheese balls in the refrigerator for 2 hours to firm up. While they firm up, make the rolo ornament topper.
- Before serving, roll the ball in a bowl with high sides with sprinkles.
- Top with the rolo ornament topper and serve with cookies of your choice or pretzels!
Notes
- Raw flour may contain harmful bacteria when eaten uncooked. Toast the cake mix in a 350F oven for 5 minutes to cook it.
- Using gloves to shape your cheese ball and roll them in sprinkles will save you from having stained hands for the next few hours.
- This recipe makes 4 cheese balls that use 1 cup mixture each. Each cheese ball can serve 3-4 people. Or, you can make them ½ or ¼ cup each to make them more individually portioned.
- Rolo Ornament Topper instructions are at the bottom of this post.
Tina says
How much powdered sugar do you use in this recipe? It’s not listed as one of the ingredients, but it is mentioned in step 3 of the instructions.
Mara says
Hi Tina! I am so sorry that ingredient was missing in the recipe card! It should be 1 & 1/4 cups of powdered sugar. I hope you enjoy the recipe!