
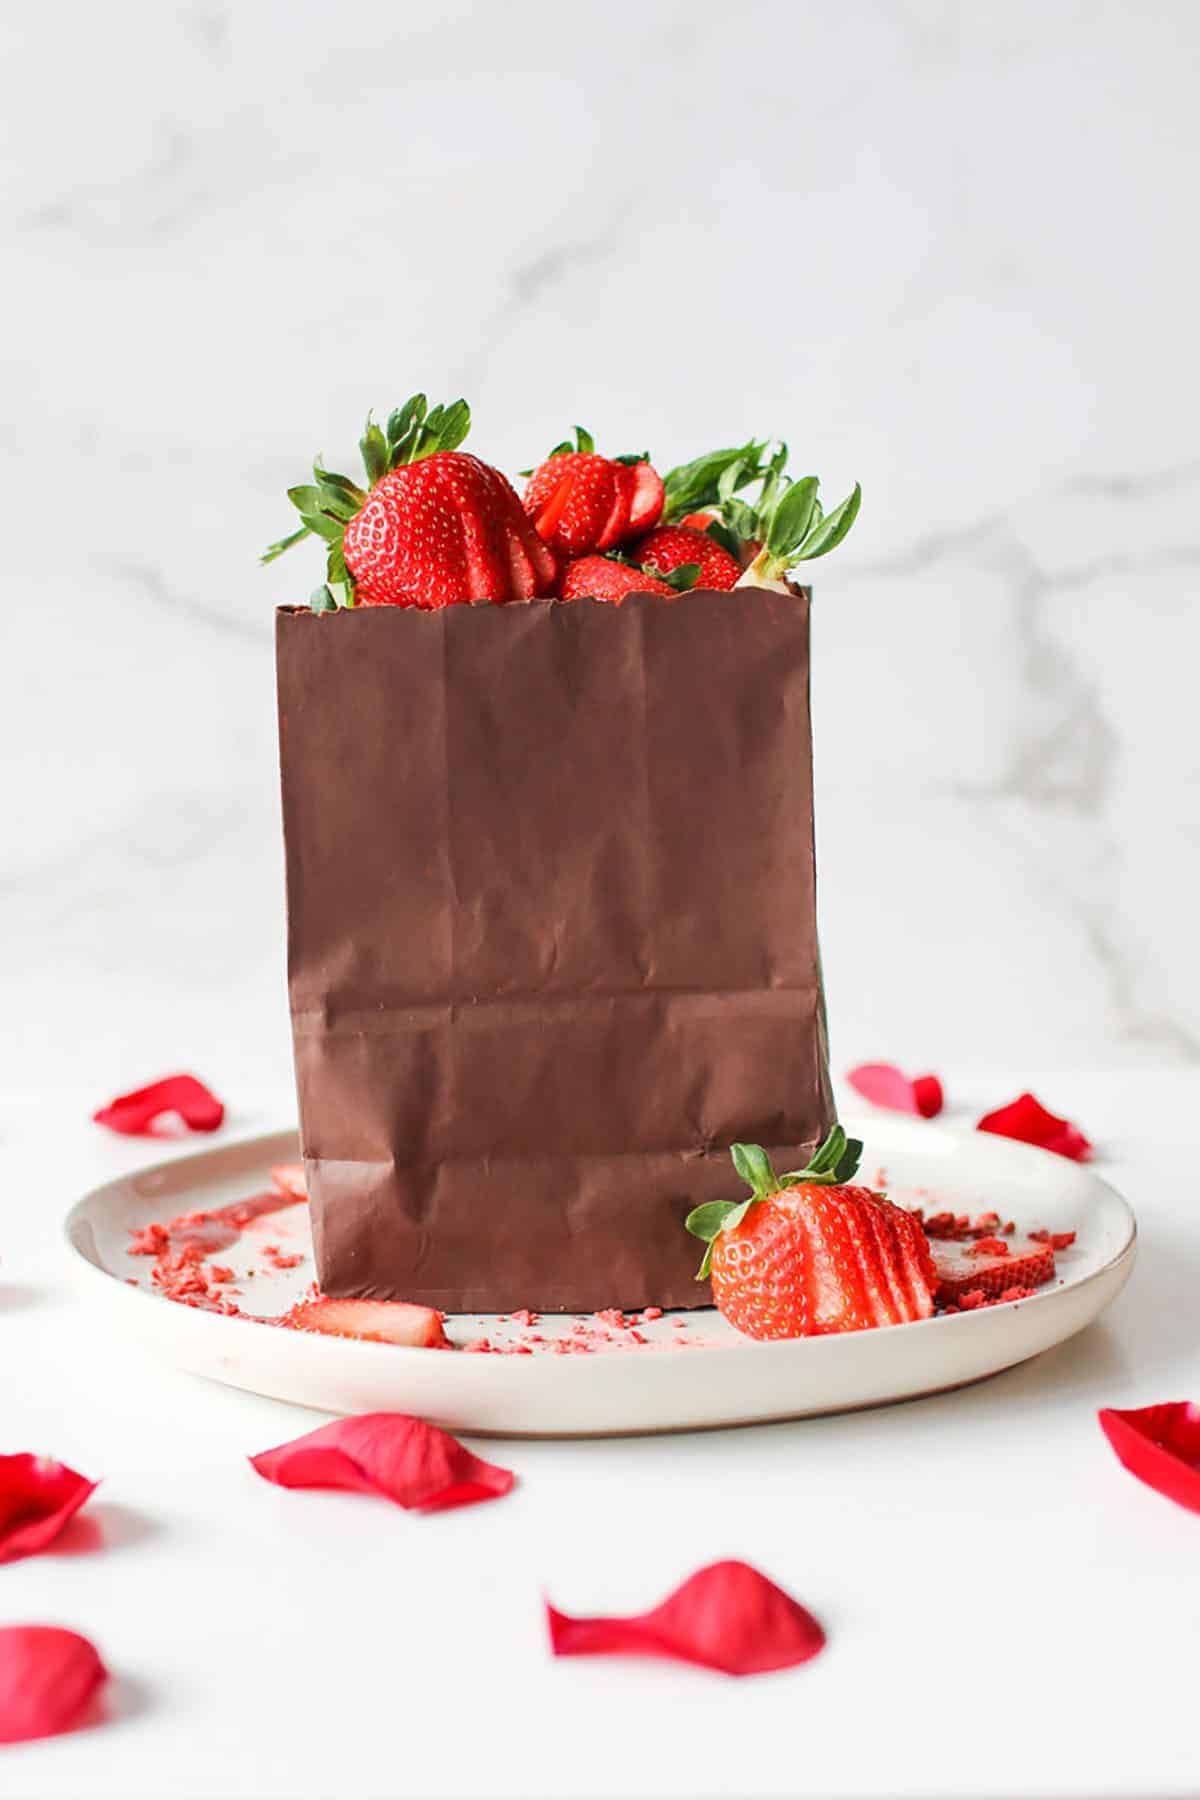
What could be better than an edible chocolate bag? Fill it with whatever your heart & stomach desires. This One-Ingredient Chocolate Bag is perfect for Valentine's Day, date night in, and any and all celebrations.
Updated December 2021 with more information.
Looking for a fun and interactive dessert? This One-Ingredient Chocolate Bag is perfect for Valentine's Day, anniversaries, birthdays, celebrations or just a date night in. It’s so much fun to dig in and find what’s in this tasty edible chocolate bag.
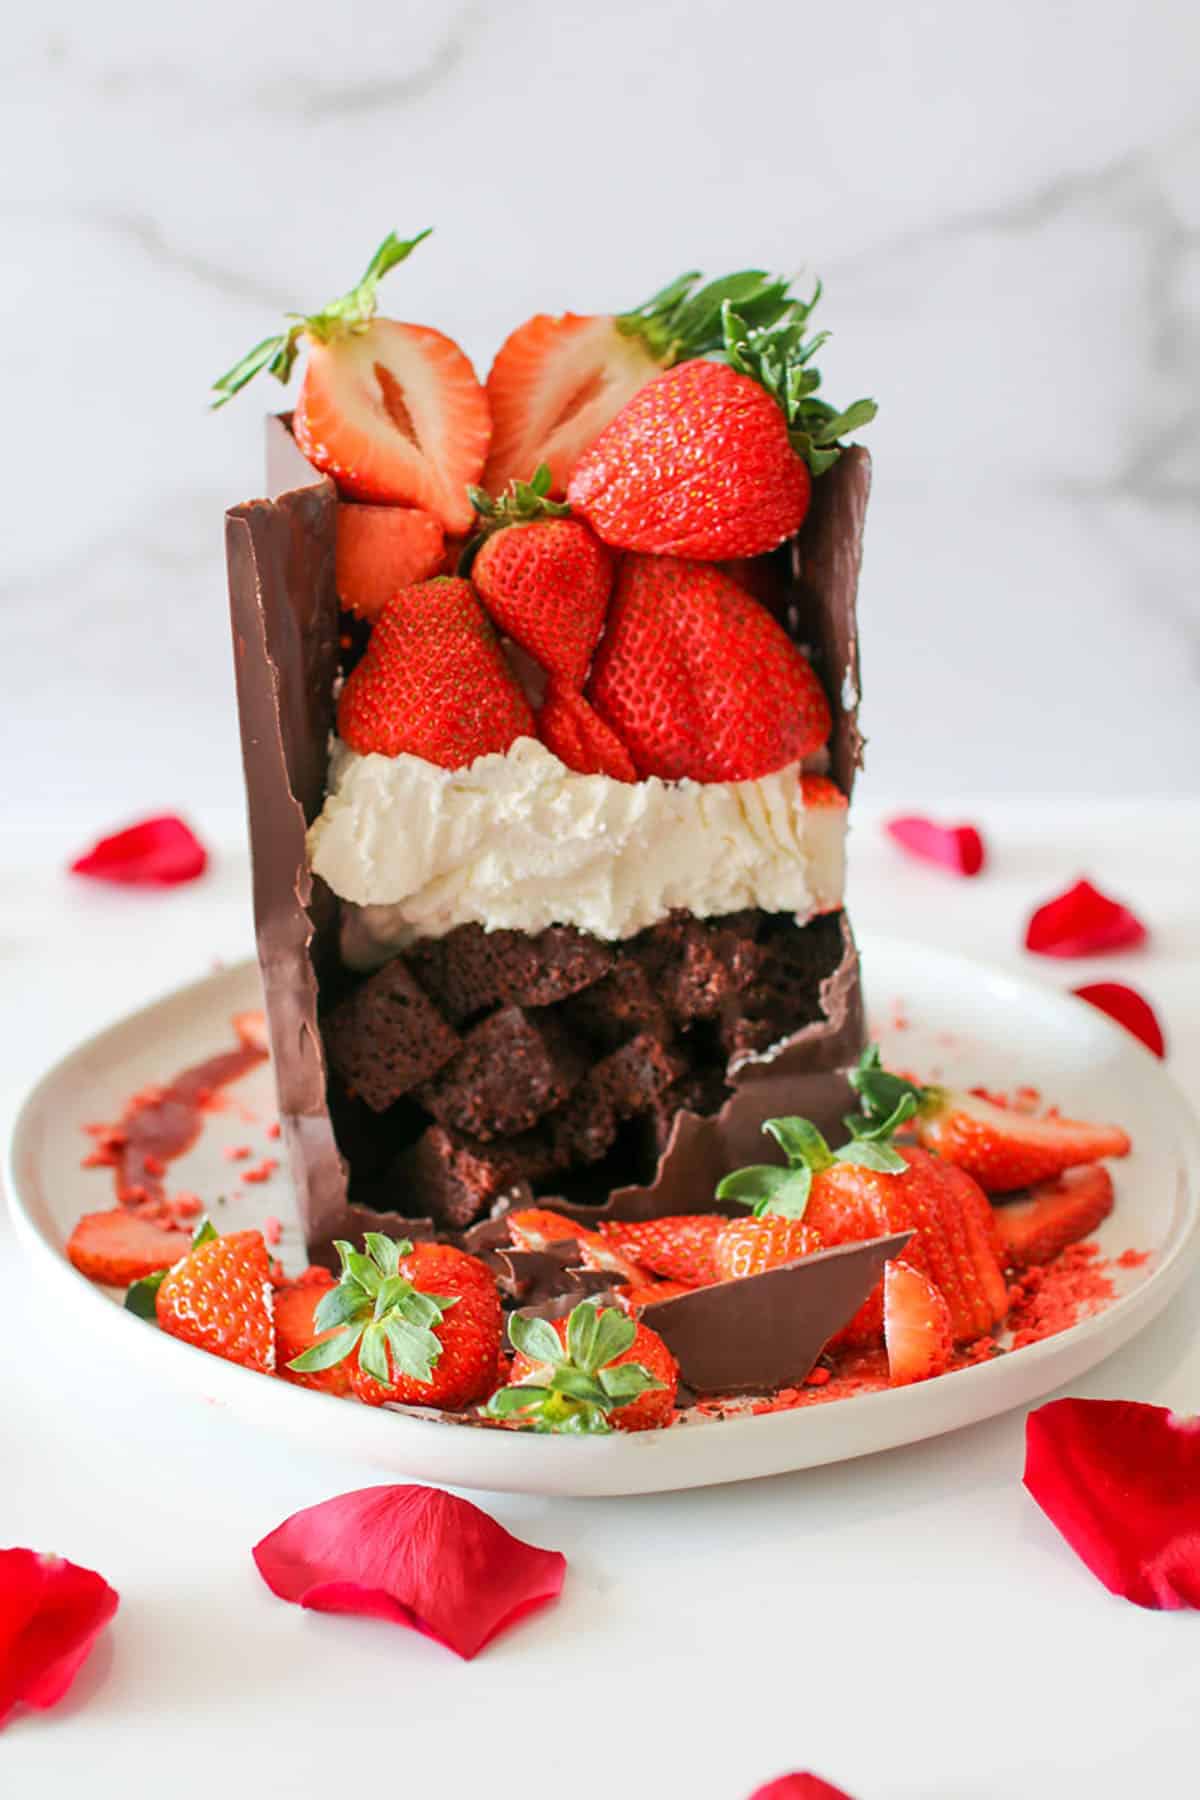
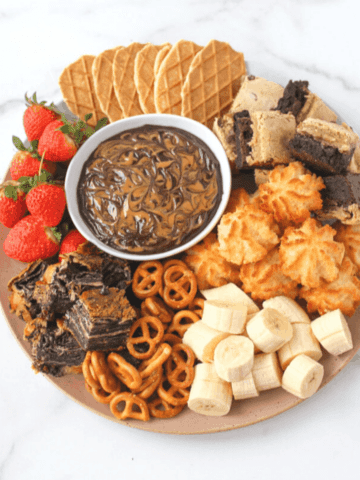
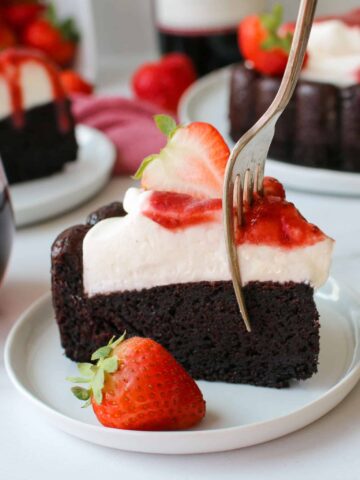
Not to mention, you can totally customize the contents of the bag to whatever your heart desires. Cookies? Sure! Ice Cream? Why not? Mousse? Yes, Please! Chocolate covered strawberries? Oh yeah! I've filled the chocolate bag with my Red Wine Chocolate Cake with mascarpone whipped cream and lots of fresh strawberries. It's surrounded by Red Wine Strawberry Sauce and crushed freeze dried strawberries.
Why you need to make this One-Ingredient Chocolate Bag
- It's a showstopper and not to mention an interactive dessert!
- Only 1 ingredient - chocolate melting wafers!
- Fill it with whatever your HEART (& stomach) desires
Ingredients
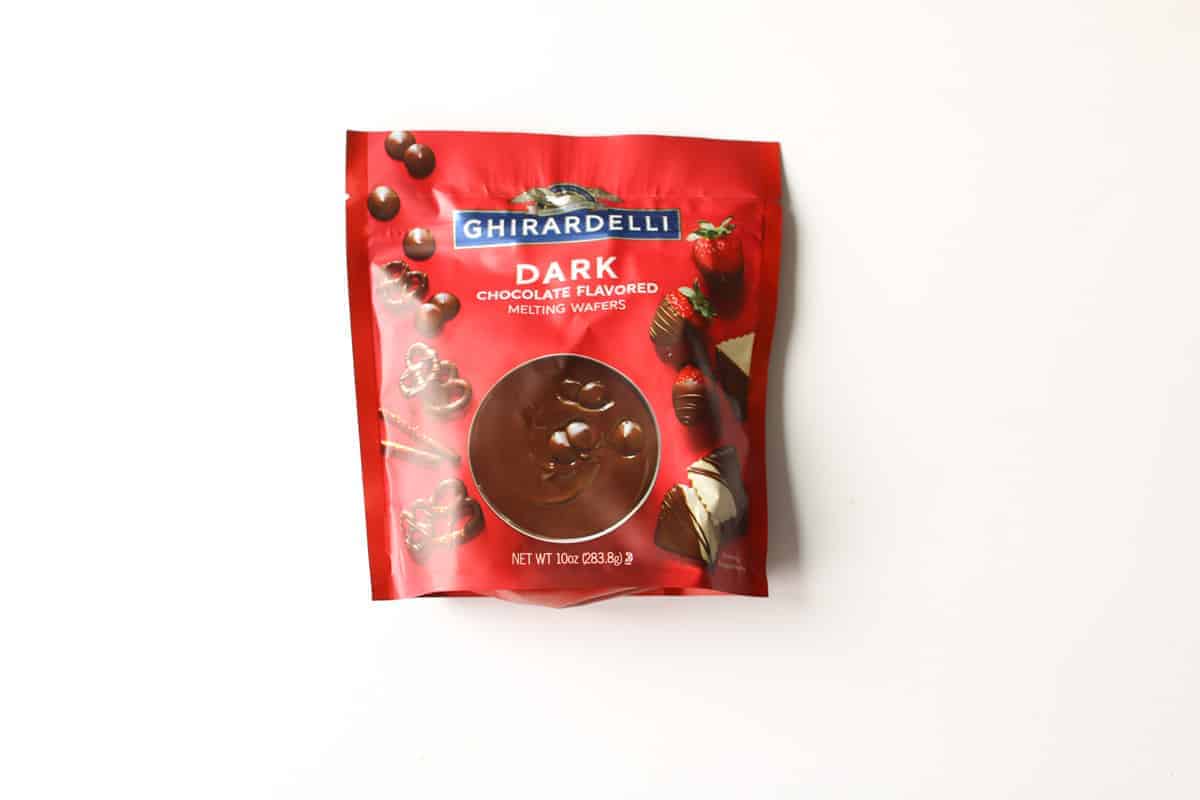
Chocolate Flavored Melting Wafers are the only ingredient you need to make this One-Ingredient Chocolate Bag. Godiva and Ghirardelli both make them and they come in milk or dark chocolate and Ghirardelli also makes a vanilla "white" flavor too.
Why I like chocolate melting wafers are they are a hassle-free way and super easy way to deal with chocolate. No need to take the time to temp chocolate!
Find them in your grocery store or Target's baking aisle by the chocolate chips.
Supplies + Notes
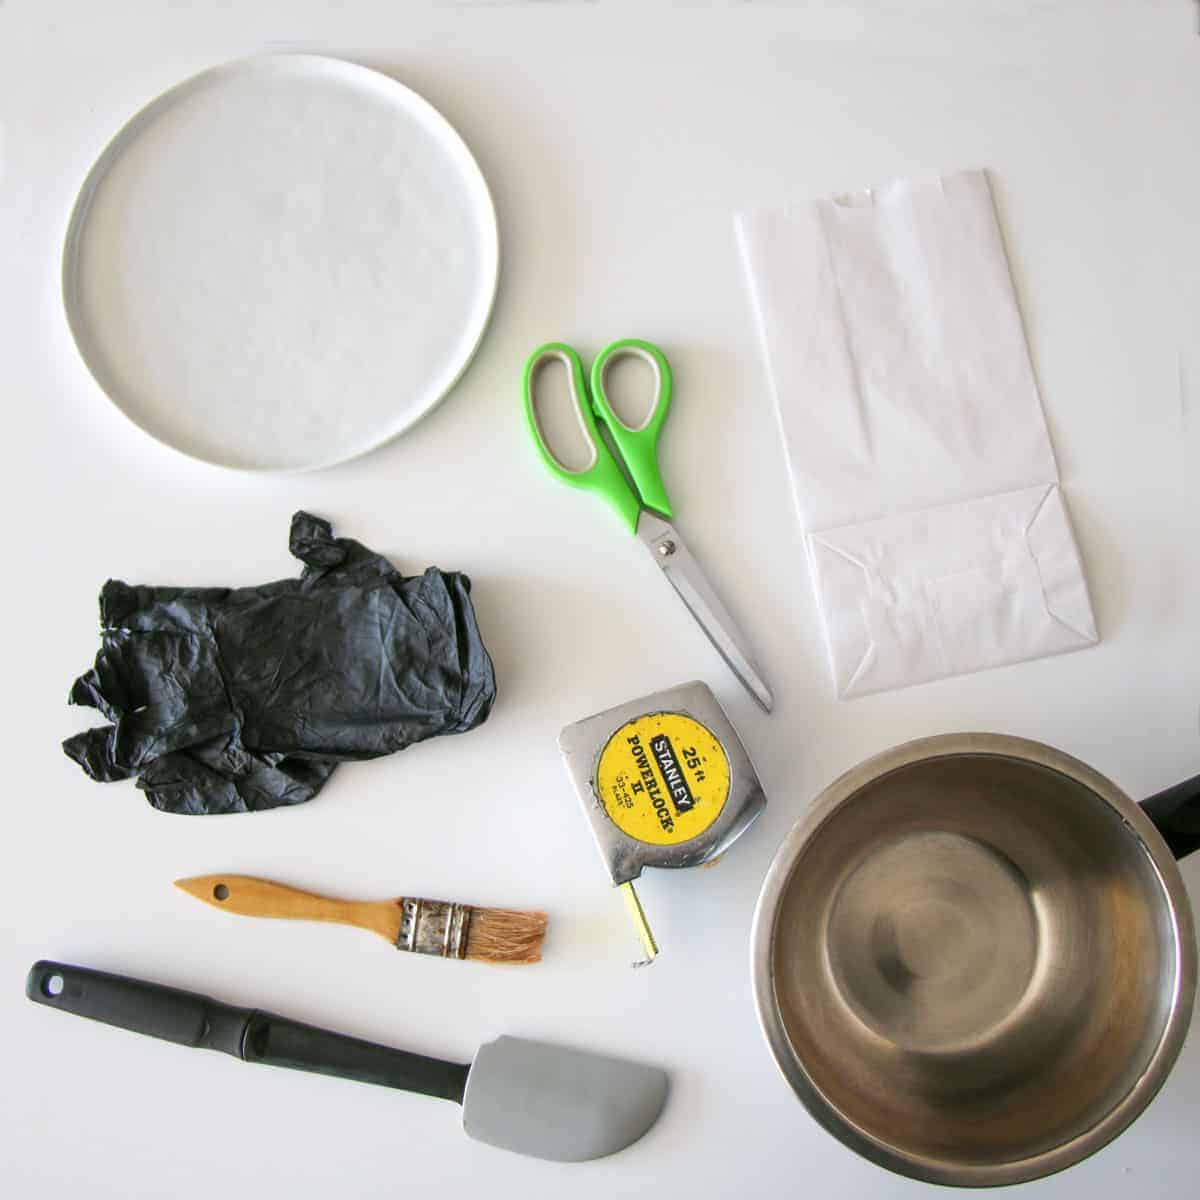
- Wax Lunch Bags: They key to the chocolate bag are these wax lunch bags. With the wax, they are grease resistant with necessary to making sure the chocolate doesn't go everywhere and essentially molds and keeps the shape of the bag.
- Scissors: used to shorten the bag to 6 inches. If the bag is too tall, it will not be able to hold the chocolate and will cave in.
- Tape Measure or ruler (highly recommended): accurately measure the bag and how much you need to snip off and cut.
- Double broiler: This is how we are going to melt our melting wafers. I get the same effect by setting a stainless steel mixing bowl (or tempered glass) over a saucepan of simmering water.
- Silicone spatula or whisk: to stir the chocolate while its melting over the double broiler.
- Pastry brush: used to brush the melted chocolate inside the waxed bag.
- Flat plate: to transfer the chocolate bag from being brushed to the refrigerator to set and back and forth.
- Food-safe disposable gloves (highly recommended): when pulling the wax bag away from the chocolate bag, the chocolate is very sensitive to heat. Your hand can start melting the bag, if you are touching it.
Step-by-Step Process Photos
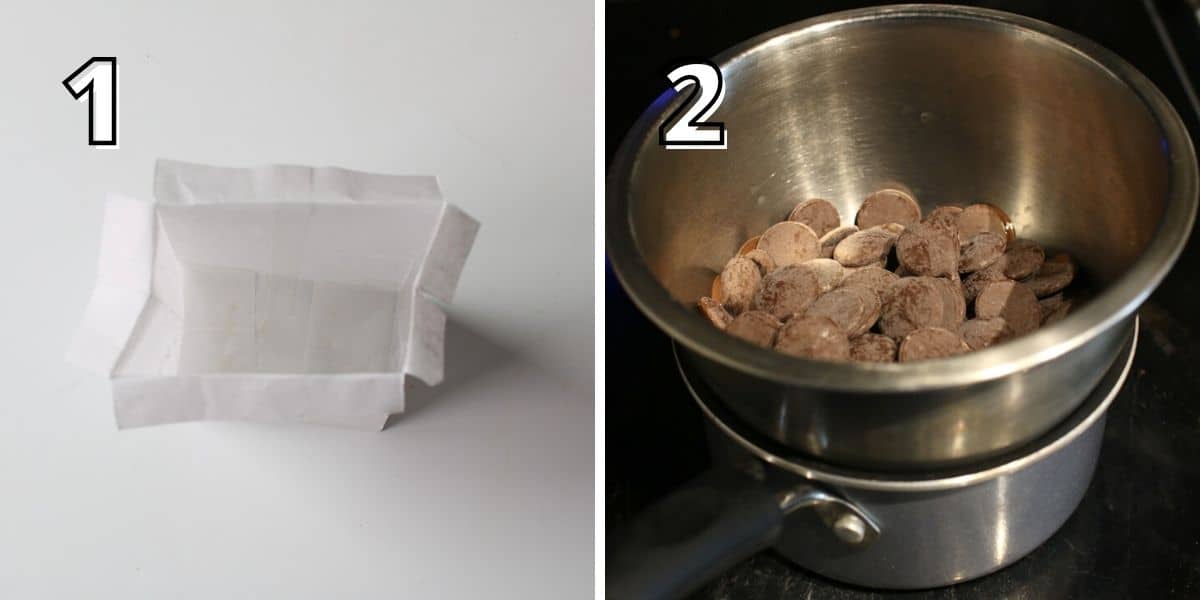
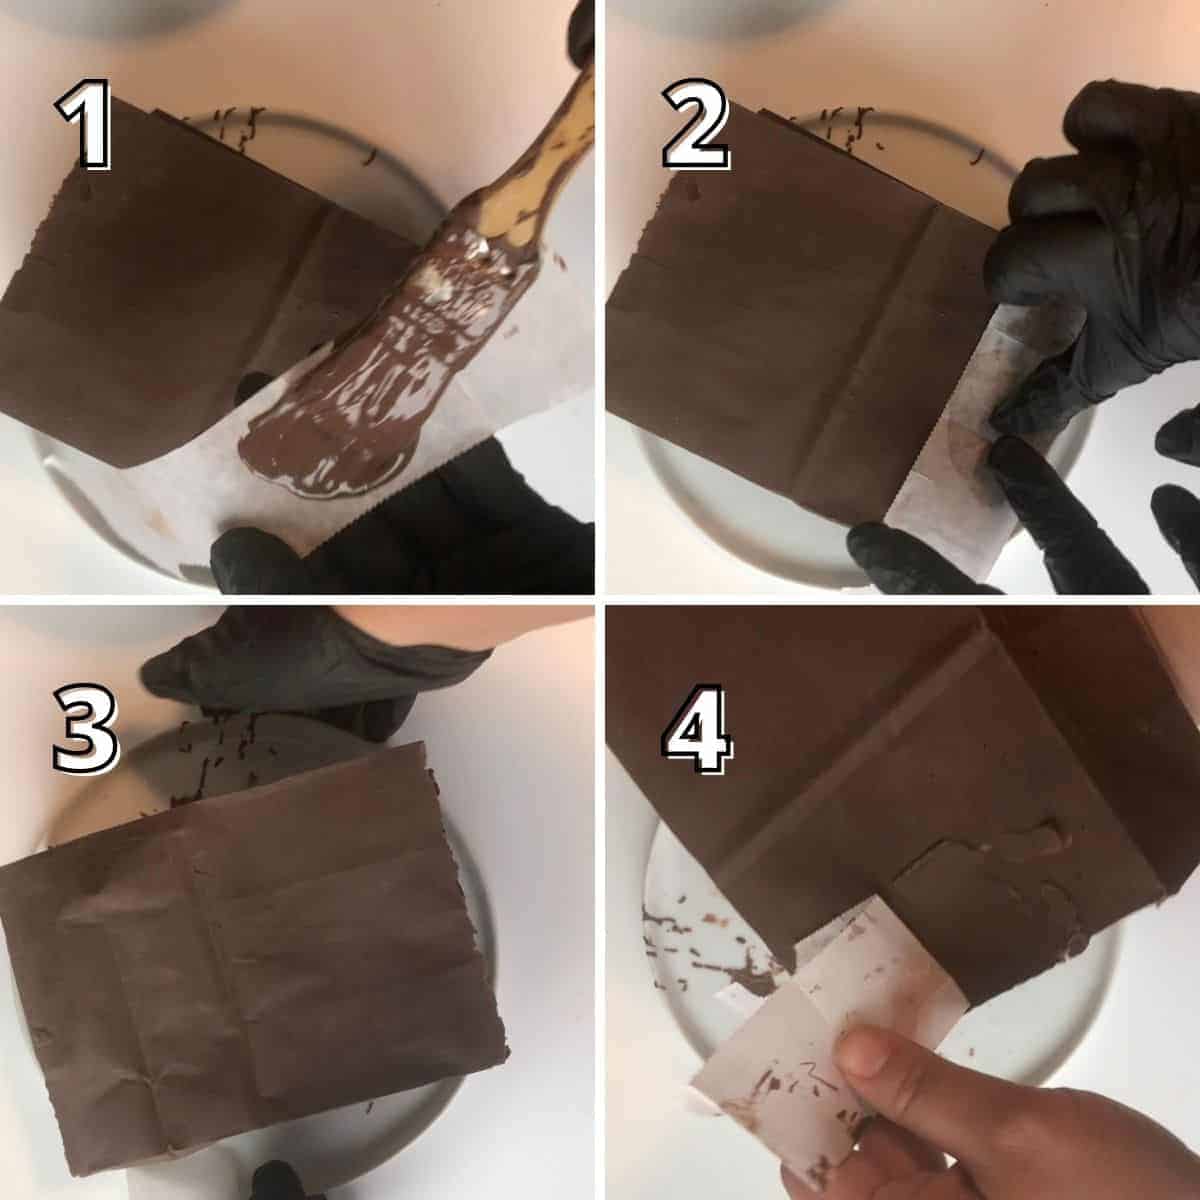
- Cut your wax bag to about 7 inches long with scissors. (Use a tape measure or ruler for accuracy). Cut the top corners of the bag about 1 inch in all 4 corners. Fold the seams over. This is where you will tear when its time to "unmold" the chocolate bag. (Bag should measure 6 inches in height)
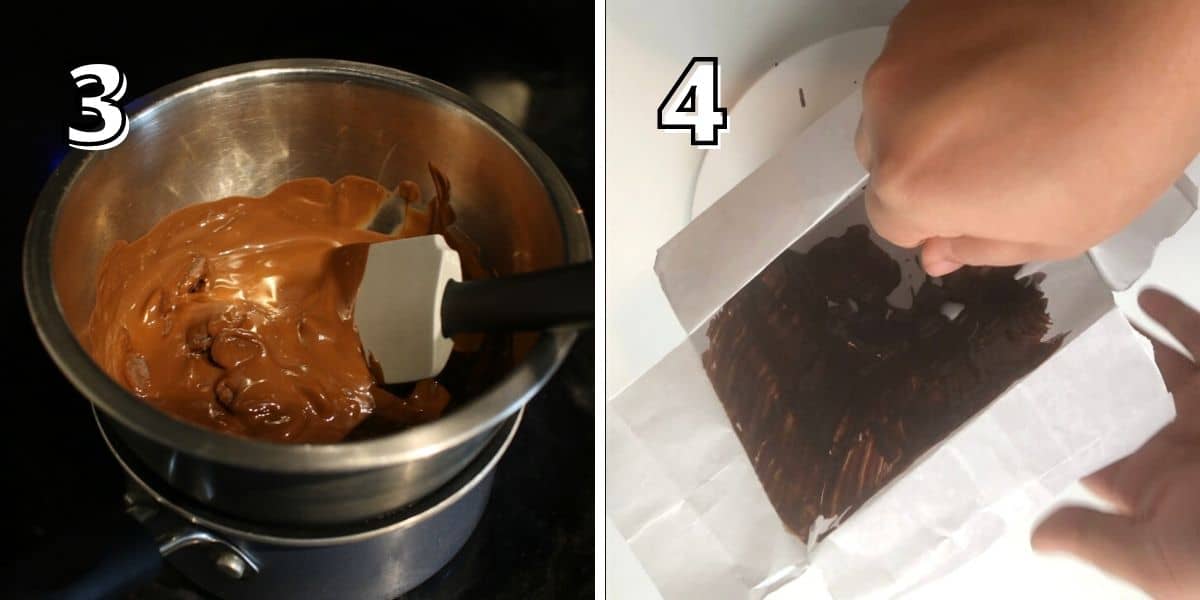
- Add water to a small saucepan. Heat until it's simmering. Place a stainless steel mixing bowl (or tempered glass bowl) over the simmering water and add chocolate melting wafers.
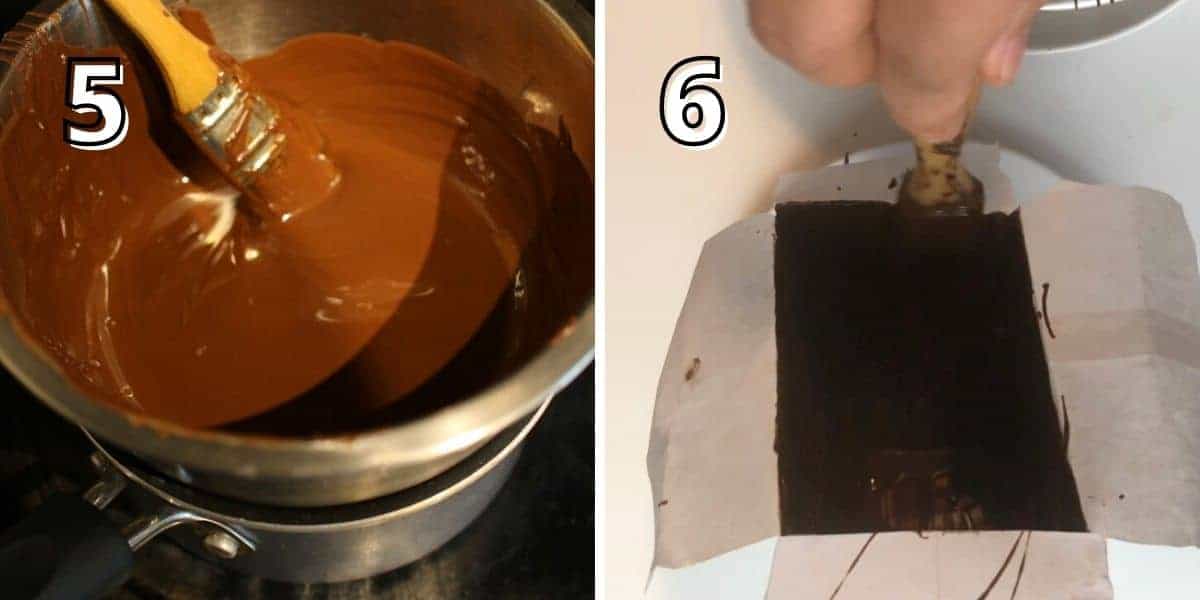
- Stir occasionally with whisk or silicone spatula until chocolate is fully melted. Then, remove the melted chocolate from the double boiler and place bag on a flat plate.
- Dip a pastry brush into melted chocolate and begin coating the inside of the bag. Once the bag is completely coated, place the plate with the chocolate bag in the fridge for 10-15 minutes until solid.
- While the chocolate bag is setting. Place the melted chocolate back onto the small saucepan with the simmering water to keep the chocolate melted.
- A few minutes (2-3 minutes) before removing the bag from the fridge, remove the chocolate from the stove and let is cool slightly. You don't want the chocolate to be so hot that it melts the chocolate. Repeat the brushing, refrigerating, placing the chocolate on the stove until you have coated the bag a total of 3 times.
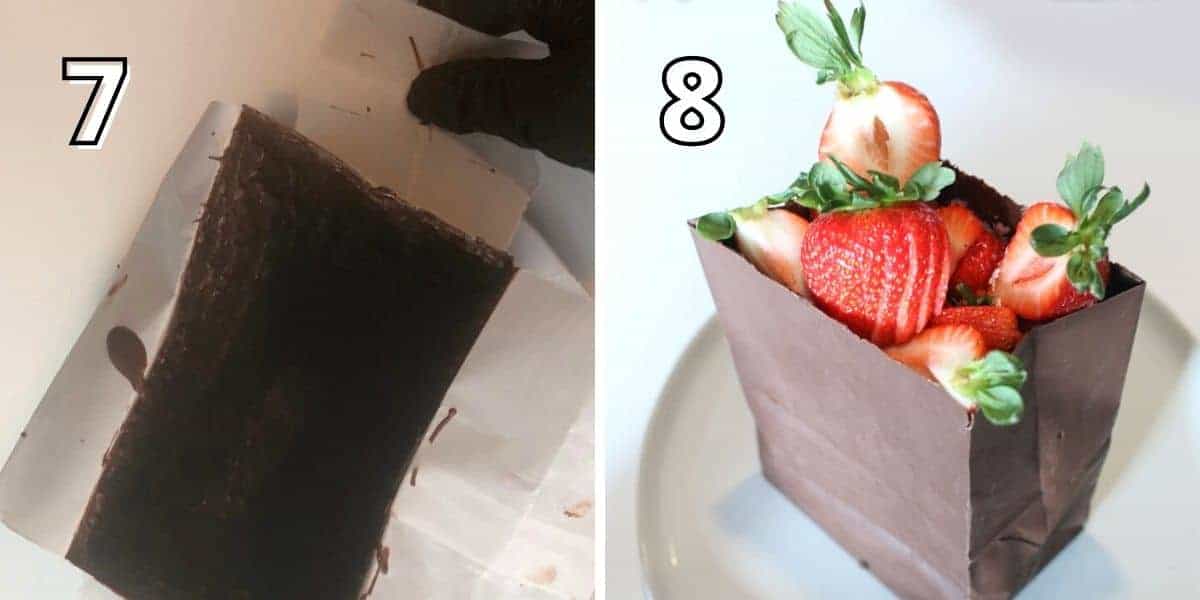
- When the chocolate bag is completely solid. Carefully remove from the fridge.Using food safe gloves, gently tearing the lip and removing the bag around the coating, lightly pulling it away. Be extra carefully remove the bottom of the bag. If you don't have gloves on hand, you can try freezing the bag for 10-15 minutes before remove the wax paper.*
- Fill chocolate bag with your desired fillings/ingredients and enjoy! You can fill the bag 30 minutes - 1 hour prior with refrigerated ingredients. Keep unfilled bags in the refrigerator for up to 4 hours.
Expert Tips:
- Get the corners! When brushing make sure to the heavily coat the corners of the bags.
- Cool chocolate slightly before re-applying: This is crucial. If, the chocolate is too hot. It will melt your previous coat.
- Carefully with the coating: If your bag is caving in your chocolate might be coated on too heavy. Try to brush some of the chocolate out if you can.
- When remove the chocolate bag from the wax bag: use food-safe gloves. As the chocolate is very sensitive to heat and can melt. Or, place in the freezer for a few minutes if you do not have gloves.
- When filling the chocolate bag: be aware of how you re layering it. Put heavier items like cake at the bottom and lighter things like whipped cream or berries at the top.

Recipe FAQs
I filled my One-Ingredient Chocolate Bag with some of my Leftover Red Wine Chocolate Cake (3 cups), Mascarpone Whipped Cream, garnished with fresh strawberries. Drizzled with my Strawberry Red Wine Sauce. Finally, sprinkled crushed freeze dried strawberries around the plate before serving.
But, this bag called be filled with various treats! Here are a few ideas...
- Chocolate covered strawberries
- Cookies: macarons, oreos, or madeleines
- Candy: valentine's colored m&ms, gummy hearts, or conversation hearts
- Pound cake, chocolate mousse and fresh berries
- Ice cream, chocolate sauce, whipped cream and sprinkles
For cracks:
1. Locate the crack.
2. Use your leftover slightly melted chocolate and pastry brush to fill in the cracks.
3. Refrigerate for a few minutes until chocolate sets.
For holes:
3. Put the side with the hole facedown on the plate. Place in the fridge for roughly 10 minutes.
4. Then, carefully pull the wax paper away when cooled.
You Might Also Like


PS If you try this recipe, why not leave a star rating in the recipe card right below and/or a review in the comments section further down the page? I always appreciate feedback. You can also follow me on Pinterest, Facebook or Instagram.

One-Ingredient Chocolate Bag
Equipment
- Wax Lunch Bags
- Scissors
- Tape Measure or ruler (highly recommended)
- Double broiler, or small saucepan, water and stainless steel mixing bowl (or tempered glass)
- Silicone spatula or whisk
- Pastry brush
- Flat Plate
- Food-safe disposable gloves (highly recommended)
Ingredients
- 10 oz dark chocolate melting wafers or use milk or white chocolate melting wafers
Instructions
- Cut your wax bag to about 7 inches long with scissors. (Use a tape measure or ruler for accuracy). Cut the top corners of the bag about 1 inch in all 4 corners. Fold the seams over. This is where you will tear when its time to "unmold" the chocolate bag. (Bag should measure 6 inches in height)
- Add water to a small saucepan. Heat until it's simmering. Place a stainless steel mixing bowl (or tempered glass bowl) over the simmering water and add chocolate melting wafers.
- Stir occasionally with whisk or silicone spatula until chocolate is fully melted. Then, remove the melted chocolate from the double boiler and place bag on a flat plate.
- Dip a pastry brush into melted chocolate and begin coating the inside of the bag. Once the bag is completely coated, place the plate with the chocolate bag in the fridge for 10-15 minutes until solid.
- While the chocolate bag is setting. Place the melted chocolate back onto the small saucepan with the simmering water to keep the chocolate melted.
- A few minutes (2-3 minutes) before removing the bag from the fridge, remove the chocolate from the stove and let is cool slightly. You don't want the chocolate to be so hot that it melts the chocolate. Repeat the brushing, refrigerating, placing the chocolate on the stove until you have coated the bag a total of 3 times.
- When the chocolate bag is completely solid. Carefully remove from the fridge.Using food safe gloves, gently tearing the lip and removing the bag around the coating, lightly pulling it away. Be extra carefully remove the bottom of the bag. If you don't have gloves on hand, you can try freezing the bag for 10-15 minutes before remove the wax paper.*
- Fill chocolate bag with your desired fillings/ingredients and enjoy! You can fill the bag 30 minutes - 1 hour prior with refrigerated ingredients. Keep unfilled bags in the refrigerator for up to 4 hours.
Notes
- Locate the crack.
- Use your leftover slightly melted chocolate and pastry brush to fill in the cracks.
- Refrigerate for a few minutes until chocolate sets.
- Using leftover wax paper and cut a piece slightly bigger than the hole. Brush the wax paper with your leftover slightly melted chocolate
- Place melted chocolate over the hole on the outside of the bag. Carefully push down to seal.
- Put the side with the hole facedown on the plate. Place in the fridge for roughly 10 minutes.
- Then, carefully pull the wax paper away when cooled.
Jack Kriz says
Simply amazing step-by step Miss Mara. Bravo!
Here is a variant idea you may like--I lived in Europe and a fav spot in Paris uses a much smaller "wax candy bag", lay the cast bag on its side, fill the bottom side with a large dollop very light and frothy-whipped crème de menthe custard or whipped cream, top with some fresh raspberries and blueberries in a raspberry sauce bed, and crown with a couple fresh mint leaves. (When it arrives you peek into the bag at candlelight as if it were a secret entrance)
When serving for a couple, you present with a butter knife or the back-side of a Pasta-Spoon to strike the long-top of the layed-over bag, which breaks open the entire bag and contents and the couple shares from the same plate....just two small spoons and enjoy. 😉